![]() Fiori App- Fiori Element with CDS View with BOPF basic CRUD operations and custom Action
Fiori App- Fiori Element with CDS View with BOPF basic CRUD operations and custom Action
To begin with CDS View with BOPF CRUD operation, let’s use a simple single table [ don’t want to perform with multiple tables with joins as this will make things little complex].
Below are the steps we are going to perform/show in this post-
1- Creating a table , 2-> Creating a CDS View with BOPF BO Enabled and with annotations with oData Publish, 3-> Testing the BO, 4-> Registering the oData and testing in gateway client, 5->creating a list report & object page fiori app,6-> Testing the basic CRUD on the fiori app,7->Adding a custom action to the BO, 8-> Testing the custom action on BO ,9->Enabling the custom action button on UI,10->Testing the custom action on the fiori app.
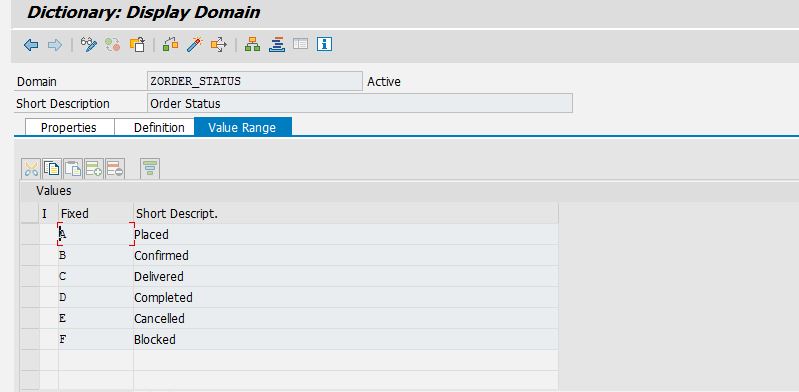
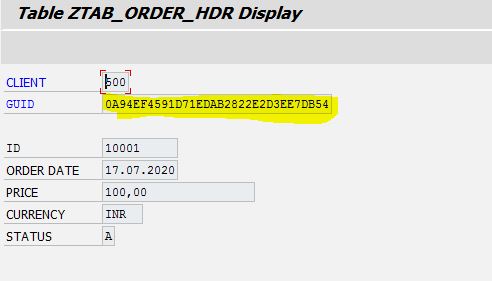
Created a simple table that stores the order details. The order status contains some domain fixed values.
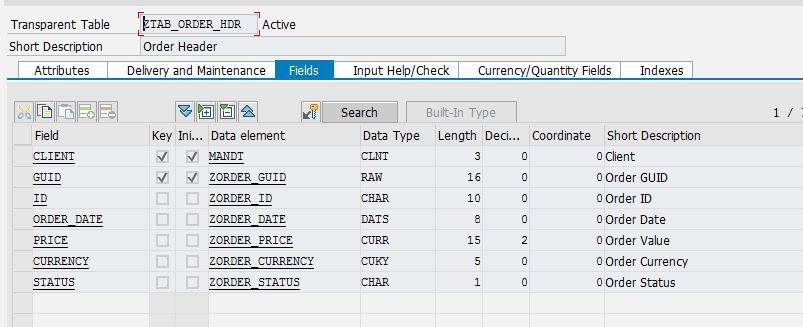
Domain fixed values- for the order status field.
Let’s create a CDS view on top of the above DB table. Its quite simple.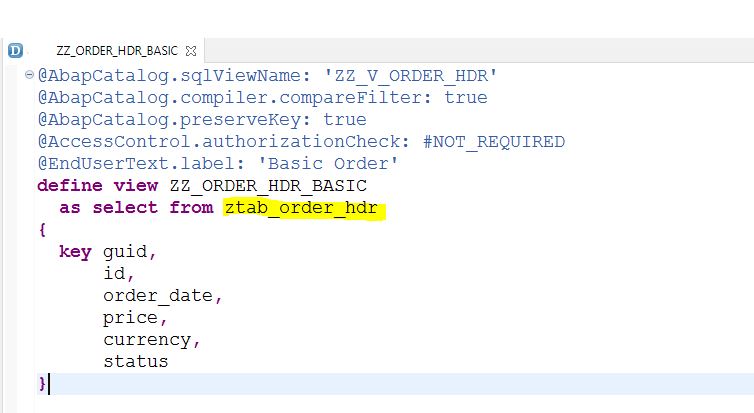
@AbapCatalog.sqlViewName: ‘ZZ_V_ORDER_HDR’
@AbapCatalog.compiler.compareFilter: true
@AbapCatalog.preserveKey: true
@AccessControl.authorizationCheck: #NOT_REQUIRED
@EndUserText.label: ‘Basic Order’
define view ZZ_ORDER_HDR_BASIC
as select from ztab_order_hdr
{
key guid,
id,
order_date,
price,
currency,
status
}
Now create another CDS view on top of the basic view created above with BO enabled.
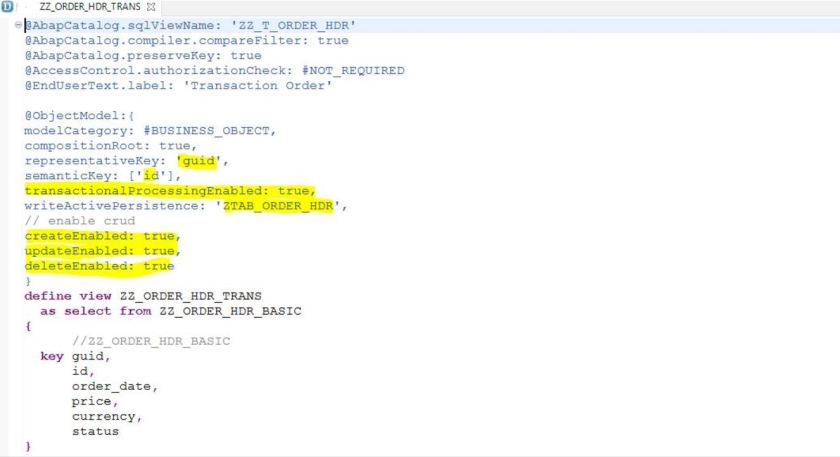
@AbapCatalog.sqlViewName: ‘ZZ_T_ORDER_HDR’
@AbapCatalog.compiler.compareFilter: true
@AbapCatalog.preserveKey: true
@AccessControl.authorizationCheck: #NOT_REQUIRED
@EndUserText.label: ‘Transaction Order’
@ObjectModel:{
modelCategory: #BUSINESS_OBJECT,
compositionRoot: true,
representativeKey: ‘guid’,
semanticKey: [‘id’],
transactionalProcessingEnabled: true,
writeActivePersistence: ‘ZTAB_ORDER_HDR’,
// enable crud
createEnabled: true,
updateEnabled: true,
deleteEnabled: true
}
define view ZZ_ORDER_HDR_TRANS
as select from ZZ_ORDER_HDR_BASIC
{
//ZZ_ORDER_HDR_BASIC
key guid,
id,
order_date,
price,
currency,
status
}
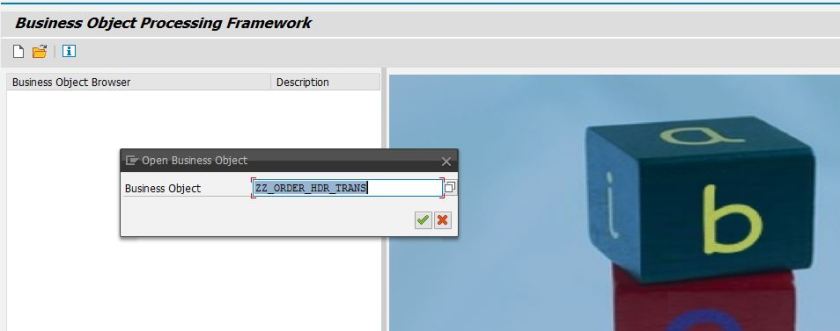
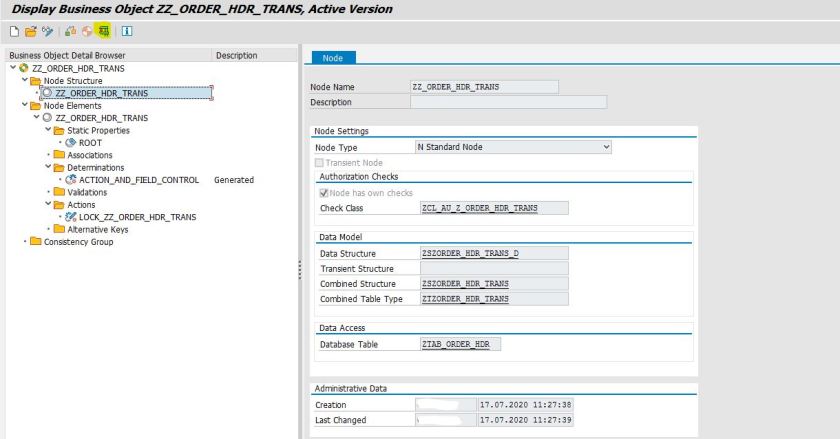
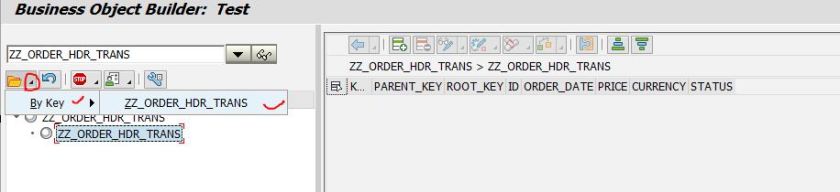
Execute Tcode- BOBX and Click on open BO button and provide the name of the CDS view which is the BO name also.
In the node few objects like- table type,structure, constant interface and etc are already generated]. Now select the TEST button.
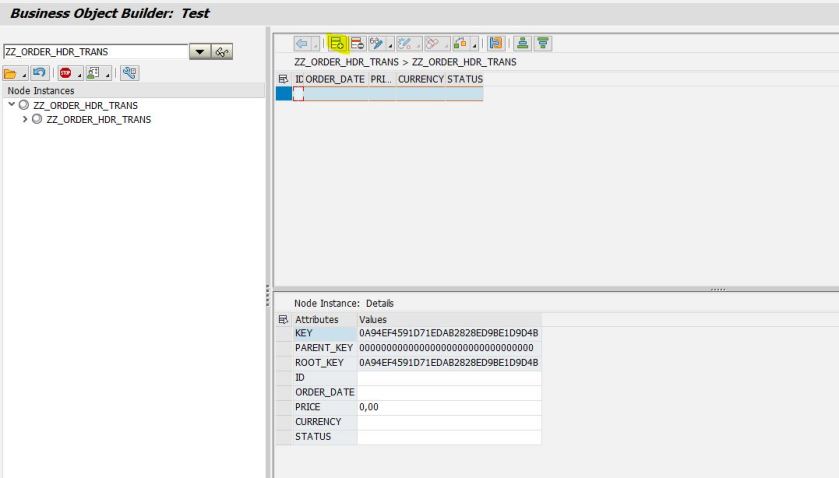
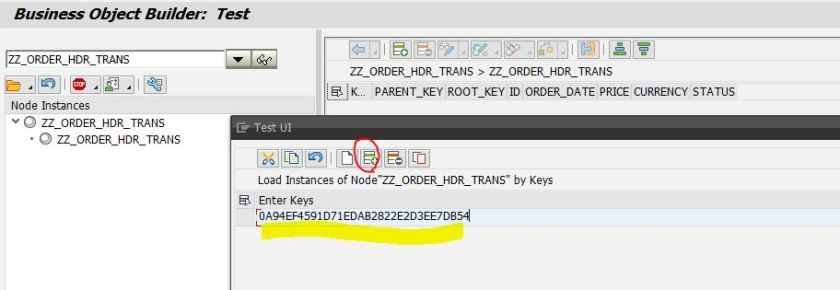
Click on the “+” button. and Create some records and save.
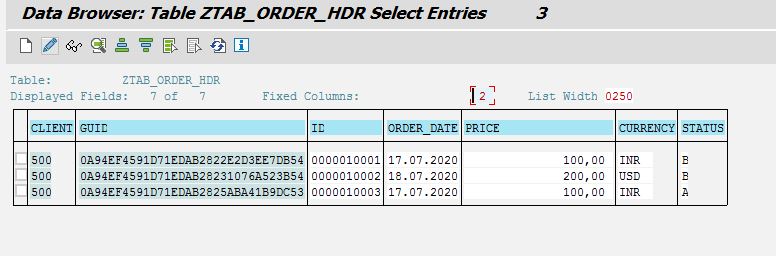
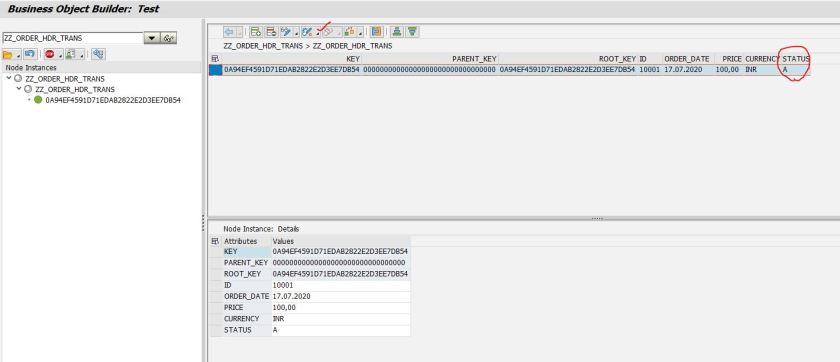
Check the table. We have few records now created in the DB table. The test of BO is successful.
Now finally create another CDS View on top of the CDS view which is BO enabled and we provide some relevant annotations to the fields to design our LIST Report and Object Page. Make oData publish true for this view.
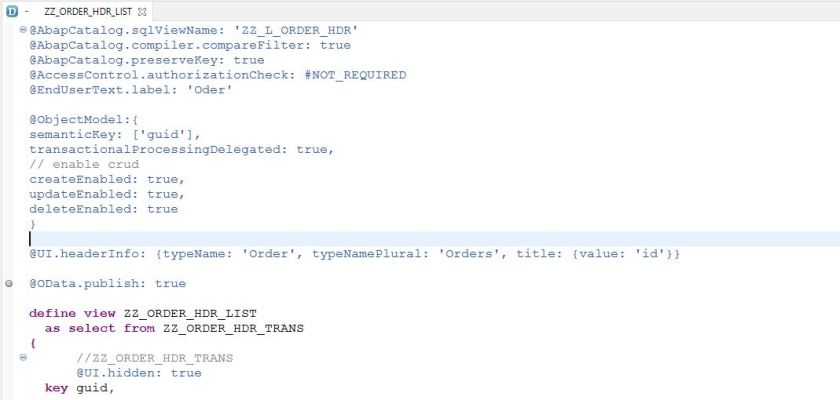
@AbapCatalog.sqlViewName: ‘ZZ_L_ORDER_HDR’
@AbapCatalog.compiler.compareFilter: true
@AbapCatalog.preserveKey: true
@AccessControl.authorizationCheck: #NOT_REQUIRED
@EndUserText.label: ‘Oder’
@ObjectModel:{
semanticKey: [‘guid’],
transactionalProcessingDelegated: true,
// enable crud
createEnabled: true,
updateEnabled: true,
deleteEnabled: true
}
@UI.headerInfo: {typeName: ‘Order’, typeNamePlural: ‘Orders’, title: {value: ‘id’}}
@OData.publish: true
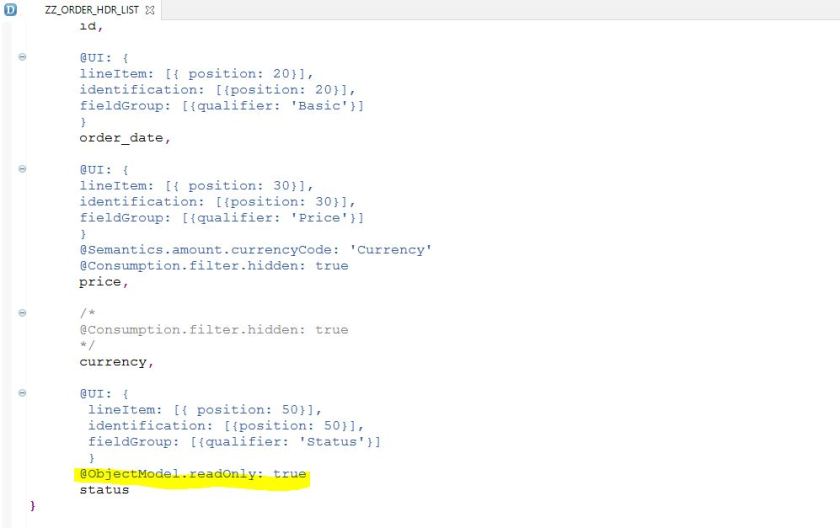
define view ZZ_ORDER_HDR_LIST
as select from ZZ_ORDER_HDR_TRANS
{
//ZZ_ORDER_HDR_TRANS
@UI.hidden: true
key guid,
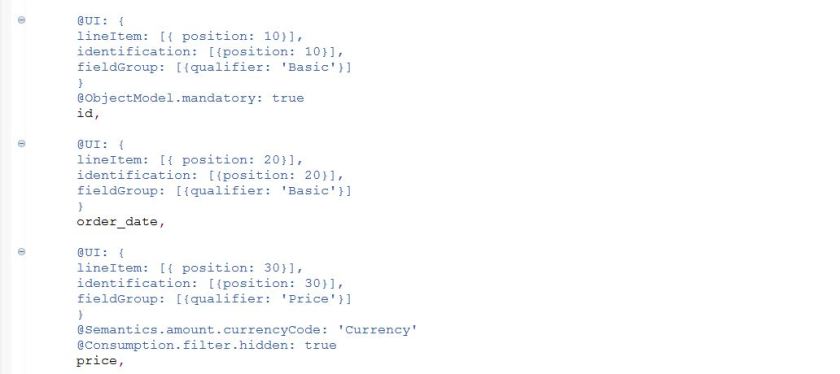
@UI: {
lineItem: [{ position: 10}],
identification: [{position: 10}],
fieldGroup: [{qualifier: ‘Basic’}]
}
@ObjectModel.mandatory: true
id,
@UI: {
lineItem: [{ position: 20}],
identification: [{position: 20}],
fieldGroup: [{qualifier: ‘Basic’}]
}
order_date,
@UI: {
lineItem: [{ position: 30}],
identification: [{position: 30}],
fieldGroup: [{qualifier: ‘Price’}]
}
@Semantics.amount.currencyCode: ‘Currency’
@Consumption.filter.hidden: true
price,
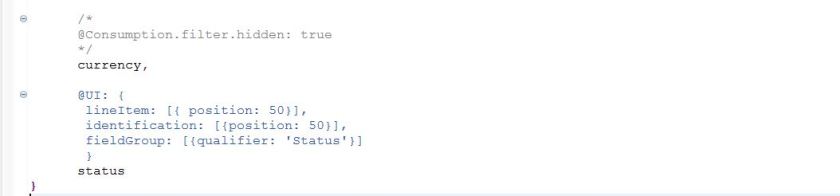
/
@Consumption.filter.hidden: true
/
currency,
@UI: {
lineItem: [{ position: 50}],
identification: [{position: 50}],
fieldGroup: [{qualifier: ‘Status’}]
}
status
}
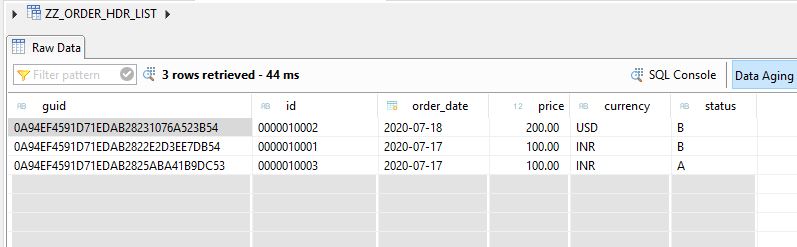
CDS View Data Preview Test.
Register the service ZZ_ORDER_HDR_LIST_CDS in the backend with Tcode- /IWFND/MAINT_SERVICE. Select the Gateway client to test the Odata Service.
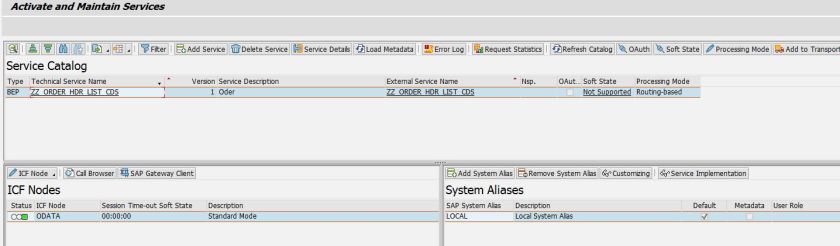
Test the entity set of the service with GET operation.[ Other Operation like PUT,POST,DELETE can also be tested additionally] We Here we can see the Service Implementation details generated.
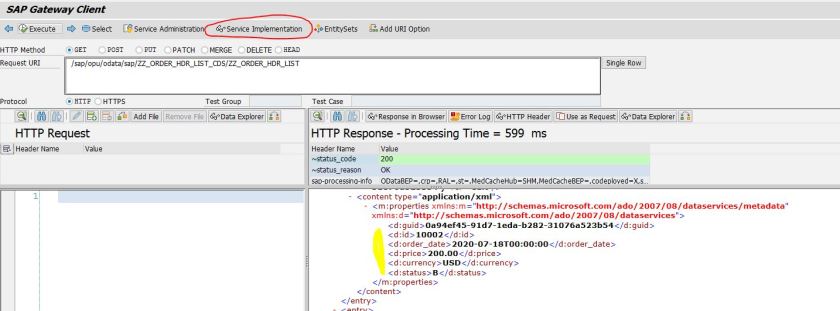
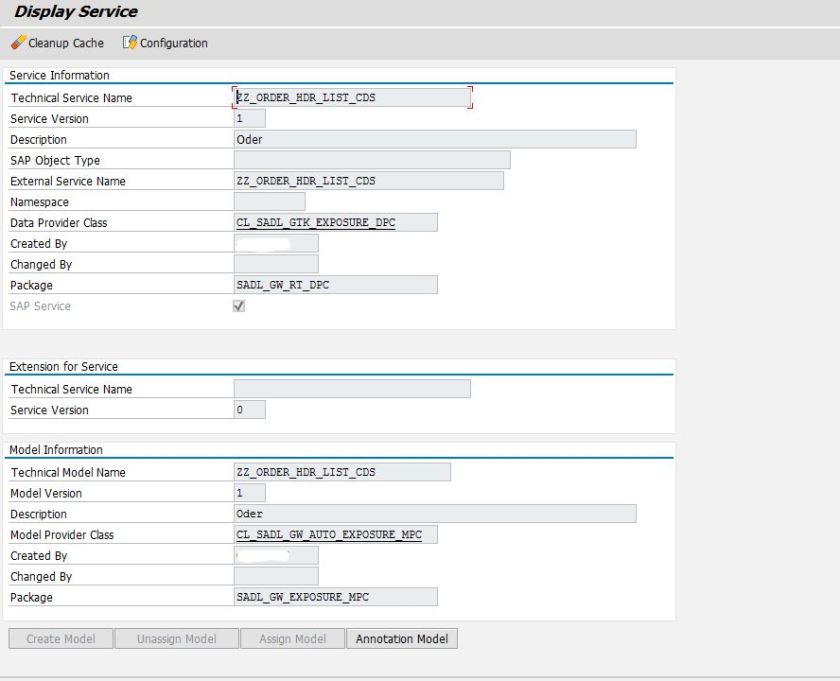
The Data Provider and Model Provider Class.
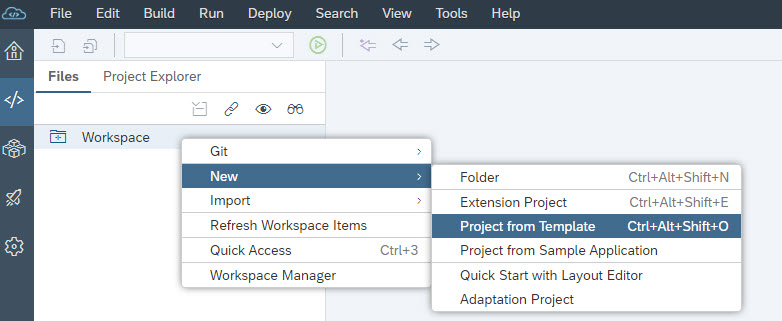
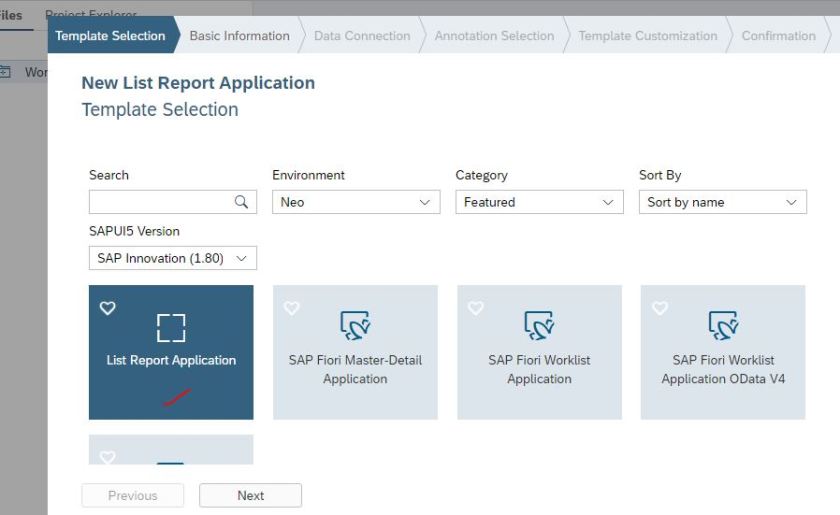
Now Time to create a Fiori App. Go to the WEB IDE and create a project from template.
Choose List report application.
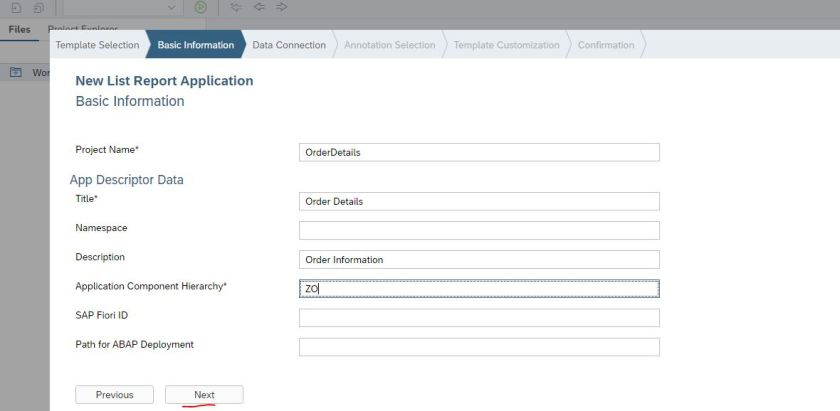
Provide necessary details-
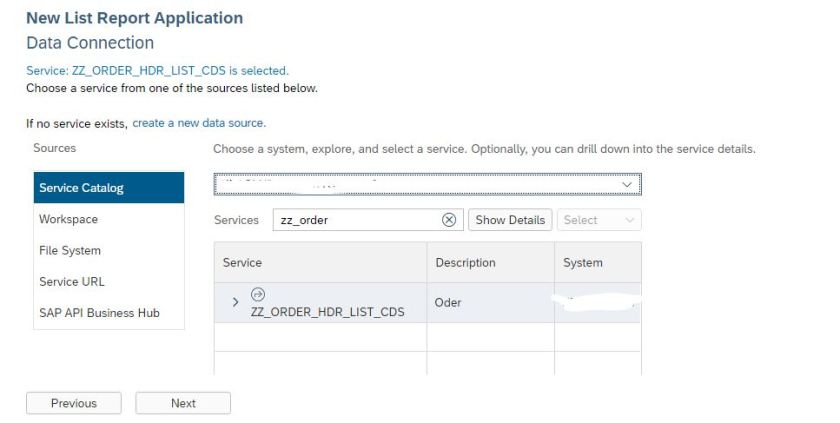
Provide the oData Service name.
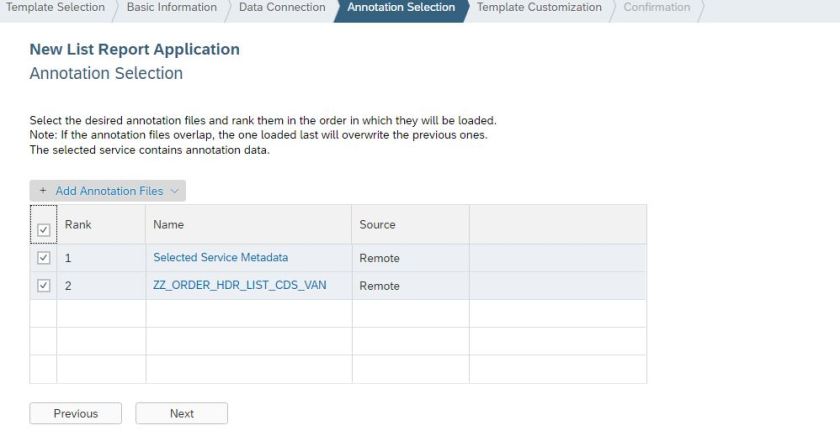
Select all-
Select oData Entity Set name and Finish.
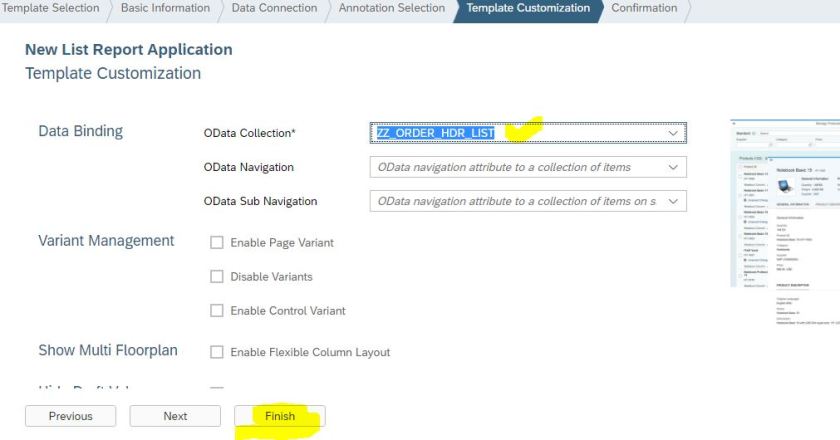
Run the app-
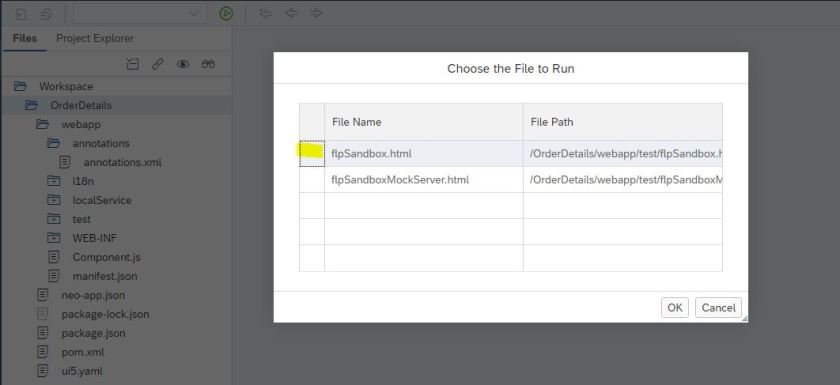
Select to RUN the app-
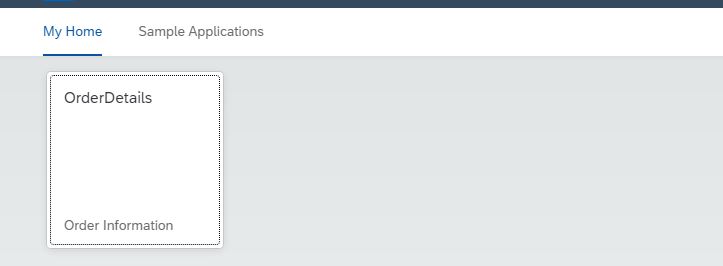
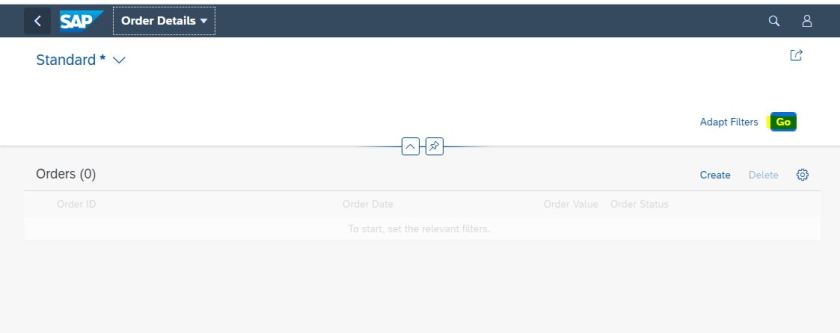
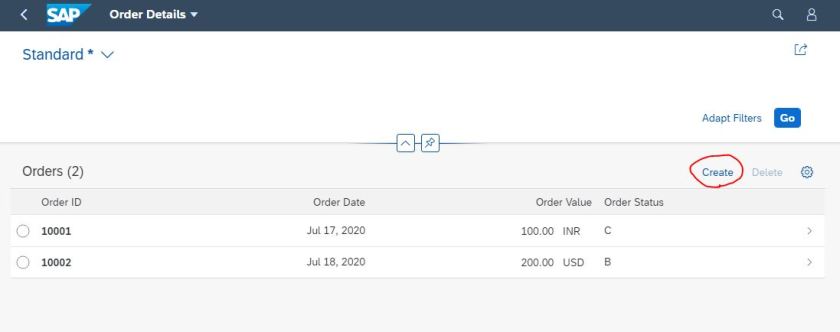
So here we have the search and list.
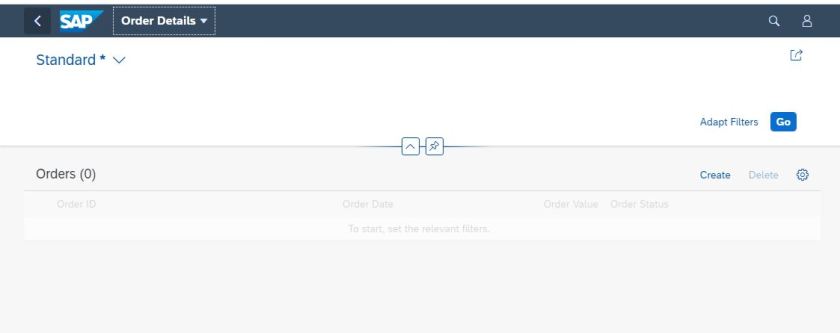
Select the GO button.
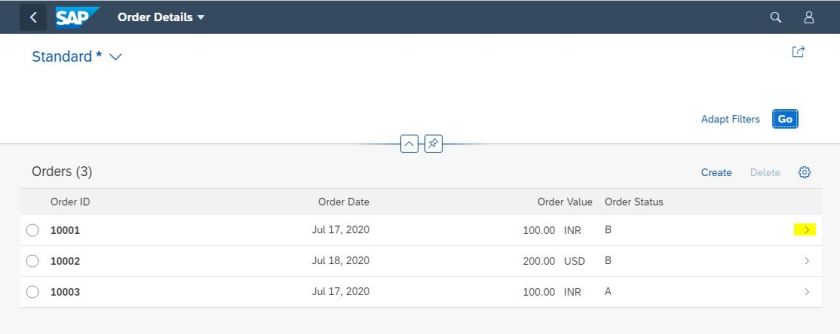
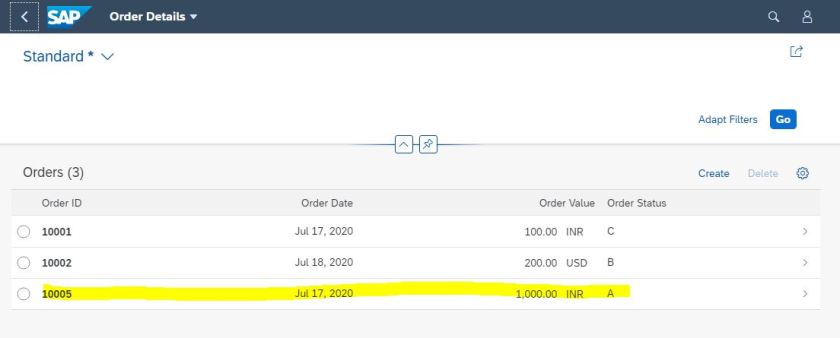
As we already created few DB records with our BO testing. Its gets all the records. So
CRUD- R: Read Operation which is a HTTP GET method is now working.
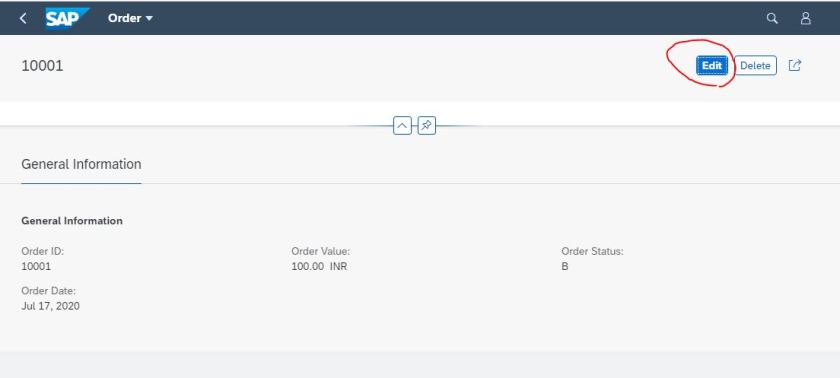
Select a line to go to the Object Page.
Here we are in Object Page and let’s EDIT it .
Now fields are editable .
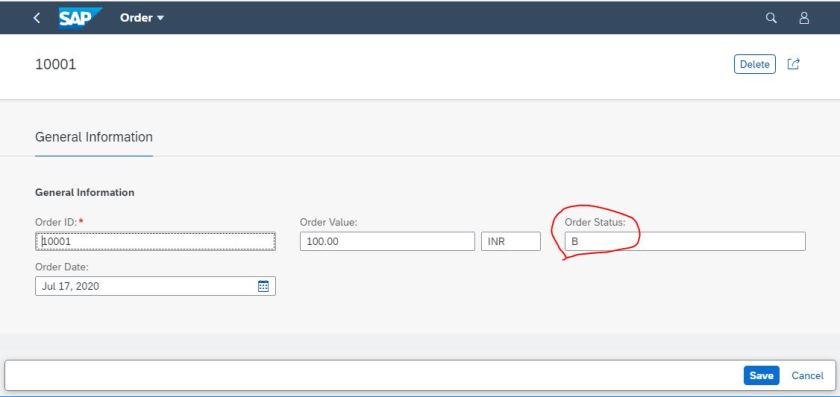
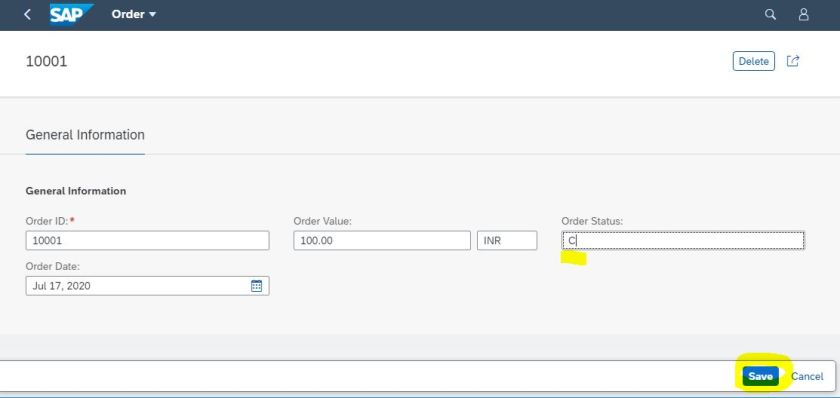
Change the status value and save
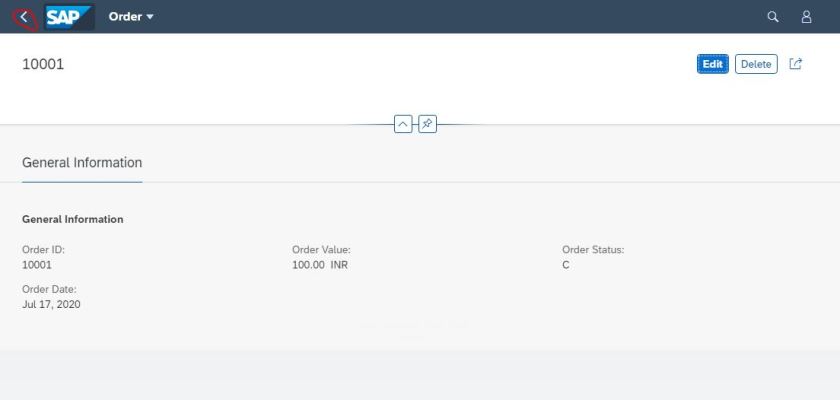
The data is saved. The Update operation is done successfully. Go back.
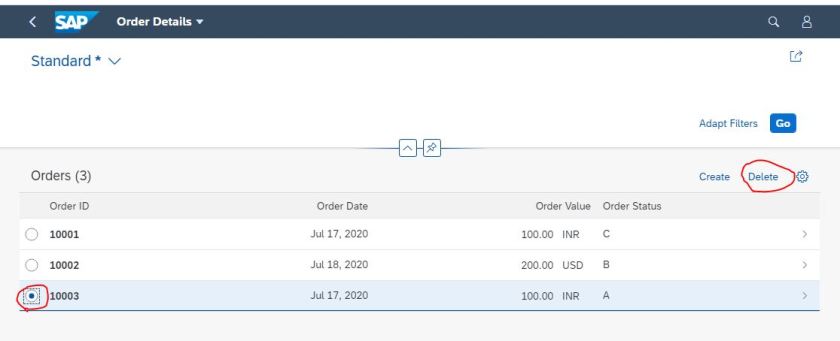
Select a line and Delete.
Confirm delete.
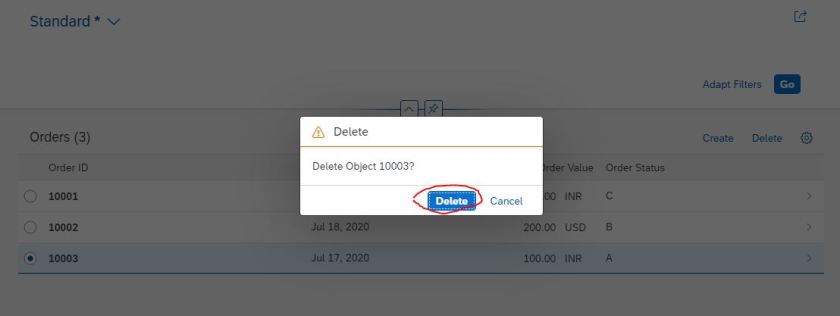
So DELETE operation is done successfully. Now try with CREATE operation.
The blank object page appears.
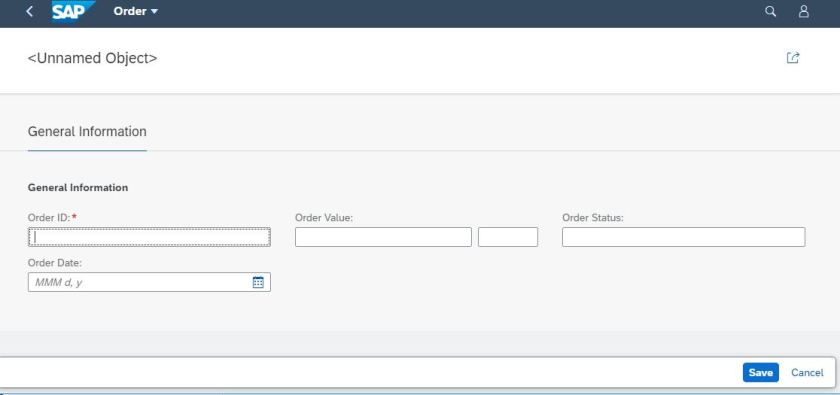
Provide the values and save.
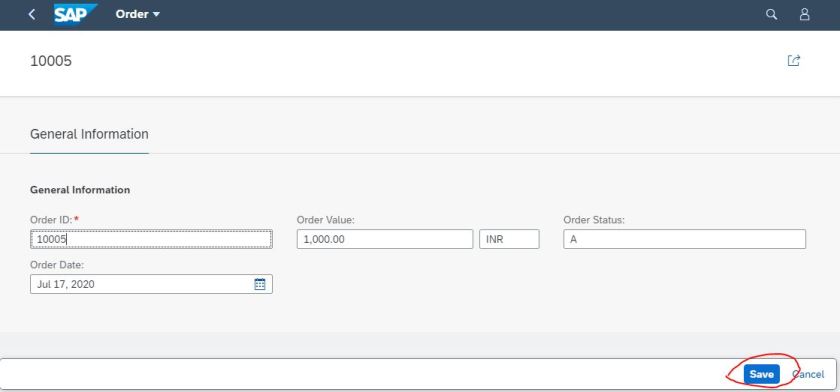
Go back.
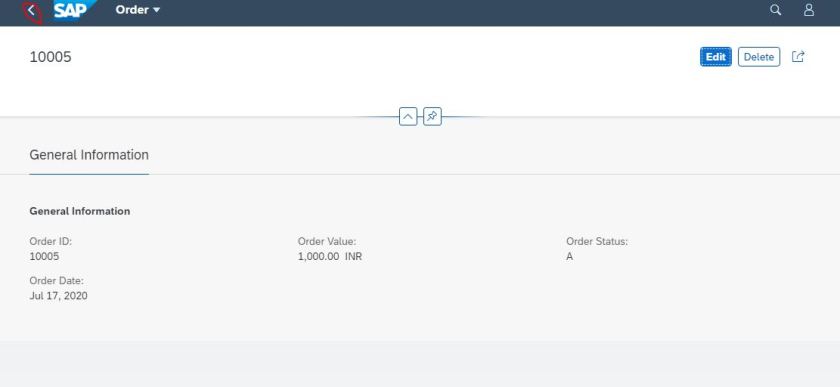
So CREATE operation works fine.
Upto this our basic BOPF enabled CRUD operations works correctly in the App.
So next is to add a Action [ to change the order status to complete] to the BO.
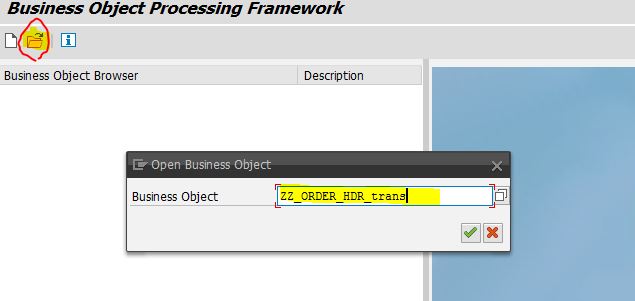
Open the BO with Tx- BOBX.

Provide the BO name.
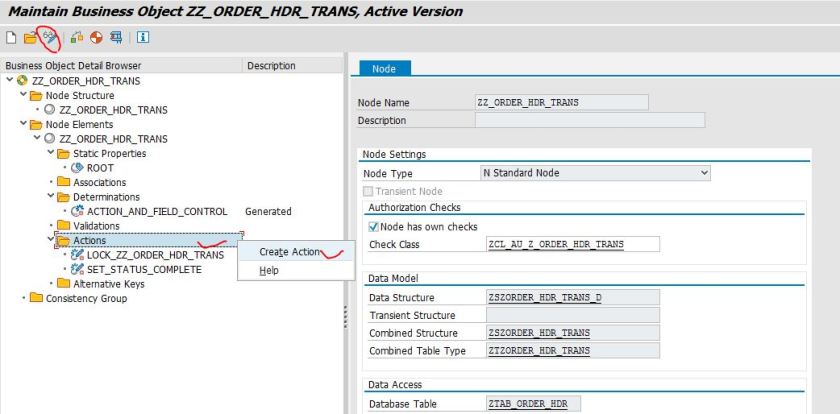
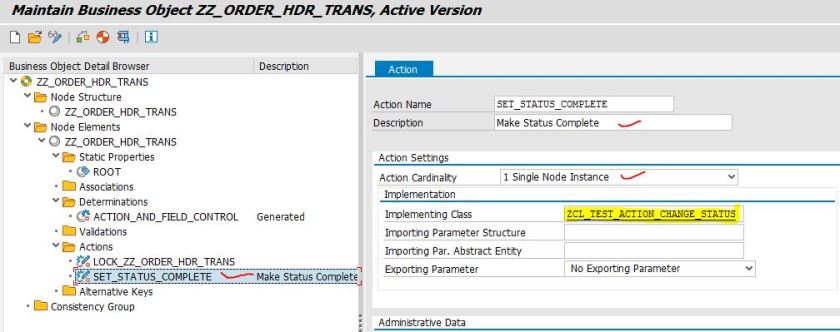
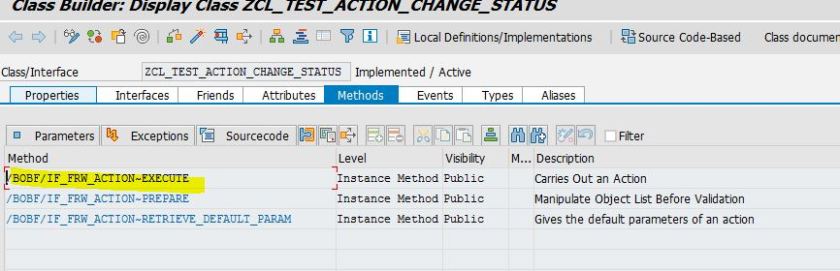
Here i already added an action ‘SET_STATUS_COMPLETE’. To add a new action go to the change mode and right click on action and from menu select create action. Then in the right side window appears.
Provide Action name and description and provide a class name and double click on the class to create the action handler class.
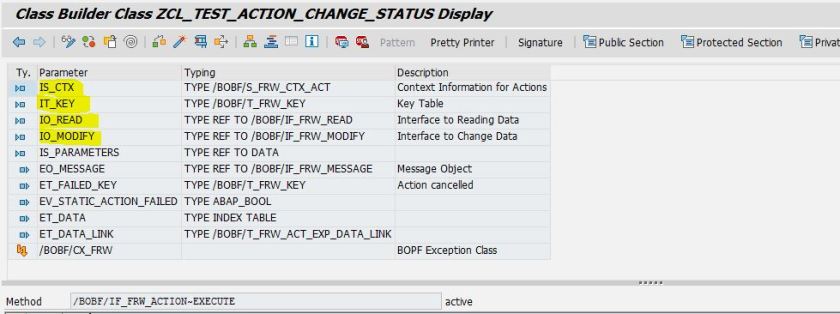
The class is created with the implemented interface. We have to implement the EXECUTE method as per the requirement. This is an empty method initially and we have to implement it.
The execute method signature details that will help to make implementation.
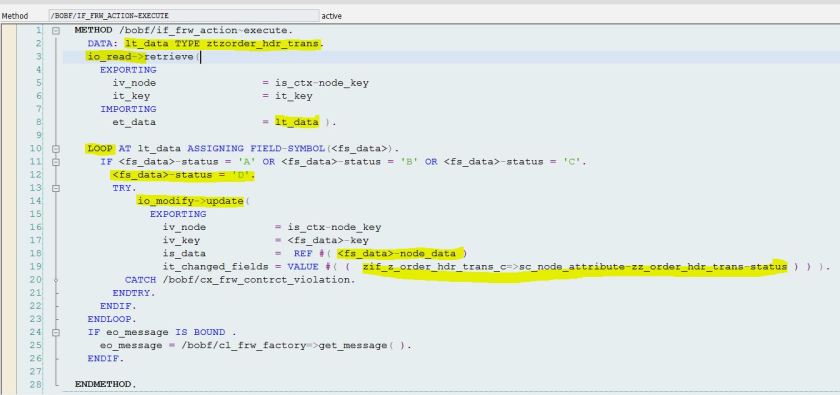
 read the data you want to change and update the status and finally cal the UDPATE method. In Below we just set the status to D[Completed] .
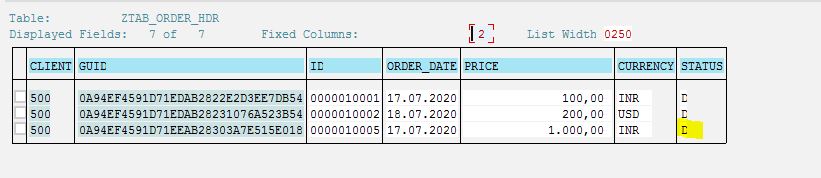
The table entries.
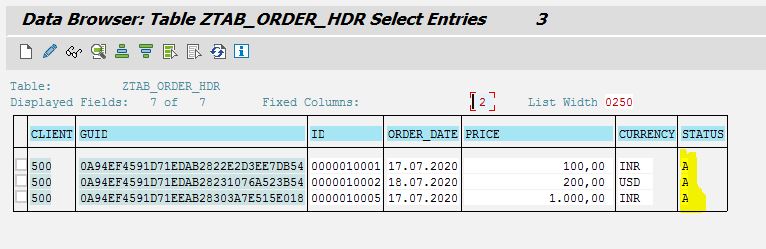
Copy the GUID as we are going to test our action on this record.
Open the Tx- BOBT

Open the BO. Search with key.
Clock on “+” and provide the copied GUID of the record.
Let’s put a breakpoint in the action handler EXECUTE method.

Sp we have the record details- the status is ‘A’ and if we apply the action it should change to D.
Apply the action-

The debugger details- Press F8 to finish the method execution.
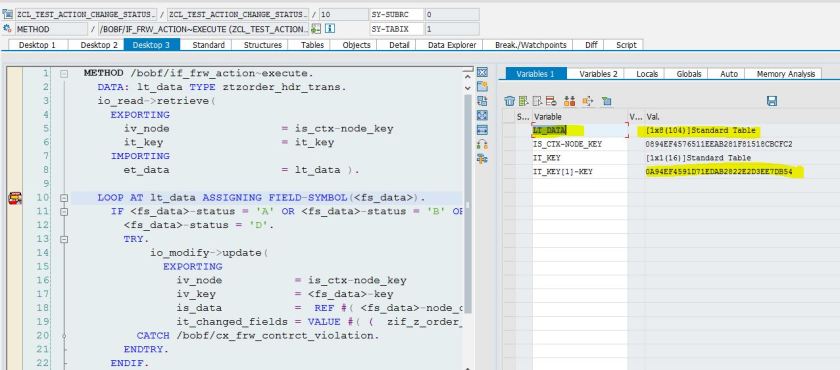
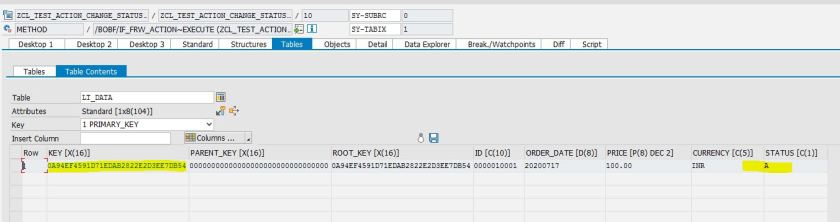
Now the status is changed to D and now save.
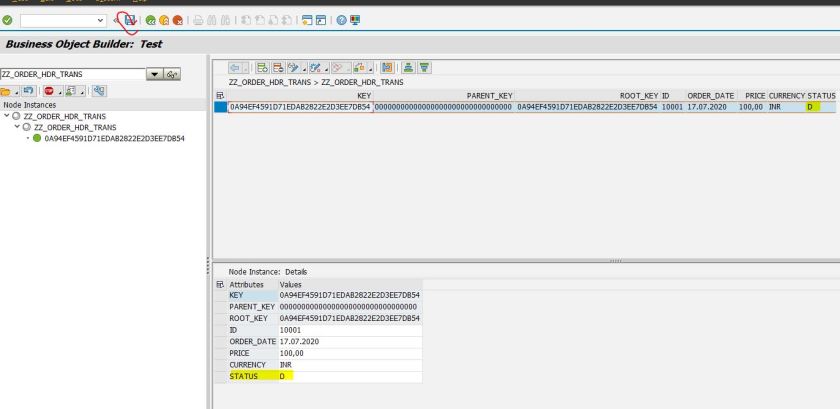
The table is now updated. So the BO action works properly. Next thing is to make the BO action available on the App.
Let’s make the STATUS field as readonly first.
Add the BO action to the CDS view with annotations so that it appears on the APP. Below we have enabled the action button on the list and the object page.
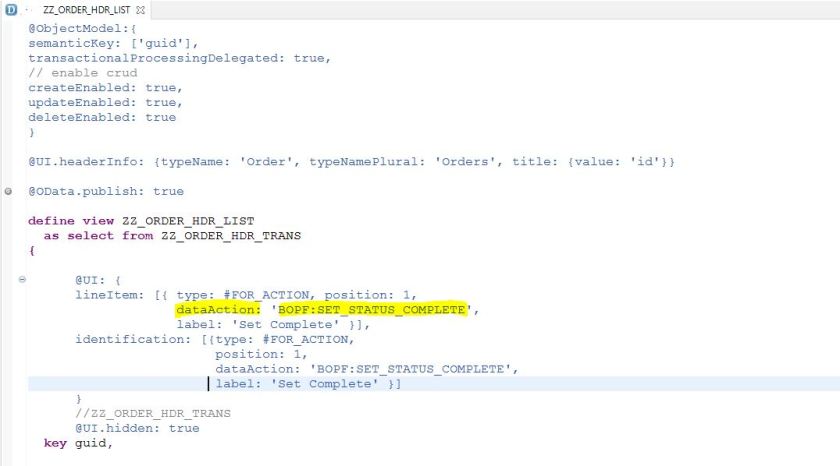
@AbapCatalog.sqlViewName: ‘ZZ_L_ORDER_HDR’
@AbapCatalog.compiler.compareFilter: true
@AbapCatalog.preserveKey: true
@AccessControl.authorizationCheck: #NOT_REQUIRED
@EndUserText.label: ‘Oder’
@ObjectModel:{
semanticKey: [‘guid’],
transactionalProcessingDelegated: true,
// enable crud
createEnabled: true,
updateEnabled: true,
deleteEnabled: true
}
@UI.headerInfo: {typeName: ‘Order’, typeNamePlural: ‘Orders’, title: {value: ‘id’}}
@OData.publish: true
define view ZZ_ORDER_HDR_LIST
as select from ZZ_ORDER_HDR_TRANS
{
@UI: {
lineItem: [{ type: #FOR_ACTION, position: 1,
dataAction: ‘BOPF:SET_STATUS_COMPLETE’,
label: ‘Set Complete’ }],
identification: [{type: #FOR_ACTION,
position: 1,
dataAction: ‘BOPF:SET_STATUS_COMPLETE’,
label: ‘Set Complete’ }]
}
//ZZ_ORDER_HDR_TRANS
@UI.hidden: true
key guid,
@UI: {
lineItem: [{ position: 10}],
identification: [{position: 10}],
fieldGroup: [{qualifier: ‘Basic’}]
}
@ObjectModel.mandatory: true
id,
@UI: {
lineItem: [{ position: 20}],
identification: [{position: 20}],
fieldGroup: [{qualifier: ‘Basic’}]
}
order_date,
@UI: {
lineItem: [{ position: 30}],
identification: [{position: 30}],
fieldGroup: [{qualifier: ‘Price’}]
}
@Semantics.amount.currencyCode: ‘Currency’
@Consumption.filter.hidden: true
price,
/
@Consumption.filter.hidden: true
/
currency,
@UI: {
lineItem: [{ position: 50}],
identification: [{position: 50}],
fieldGroup: [{qualifier: ‘Status’}]
}
@ObjectModel.readOnly: true
status
}
Run the app and the Action Button appears. Select a line.
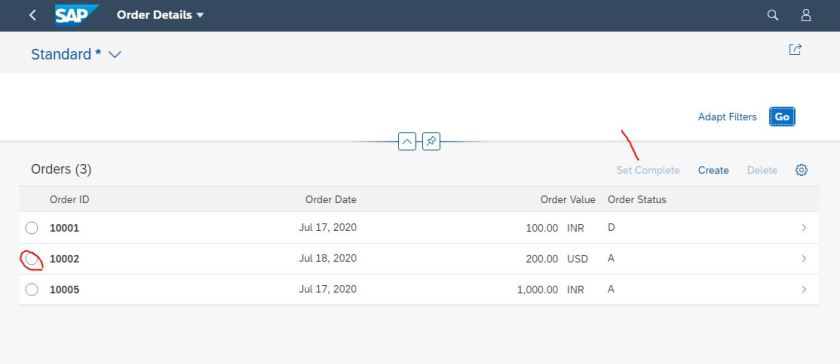
The button now enabled and now press the button to change the status.
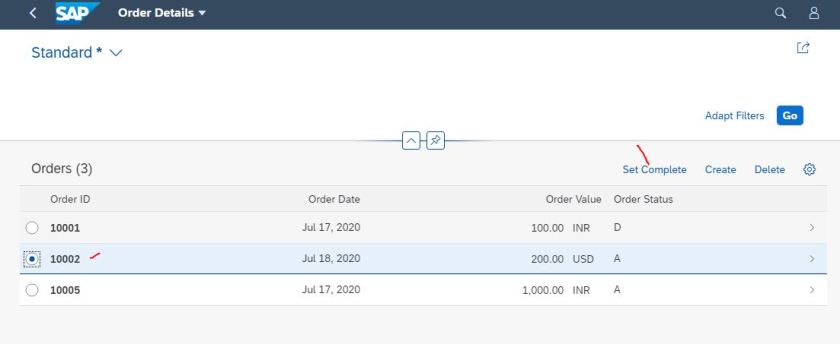
The status changed.
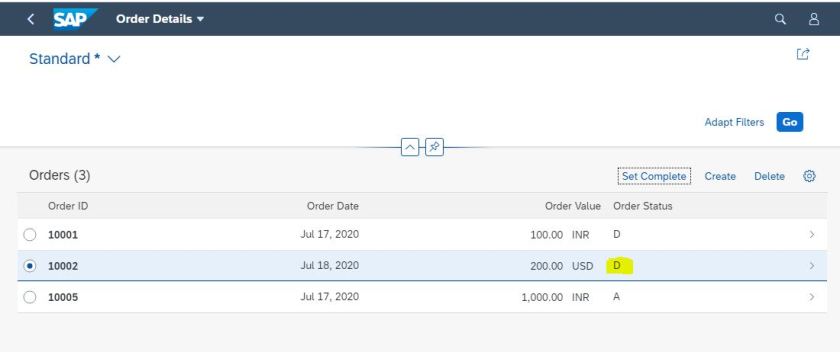
On the table also it is reflected.

Select a line and go to the object page.

Press the action button.
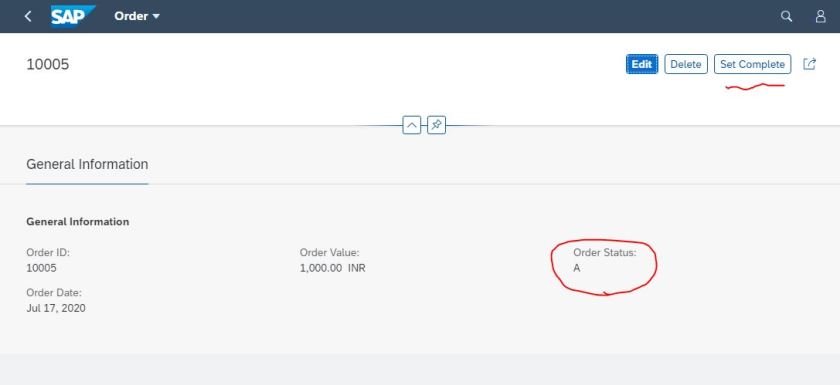
Seems the data is not getting refresh on the object page after the action. Go back.
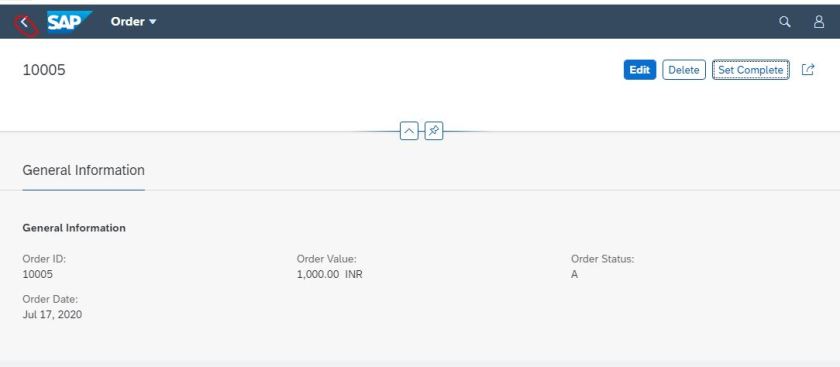
Now it appears correctly here.
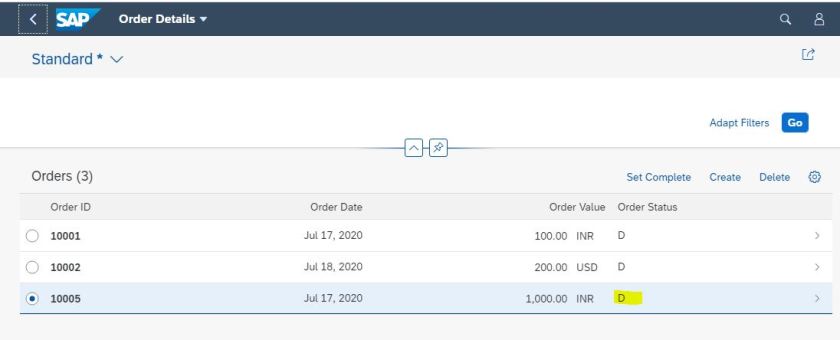
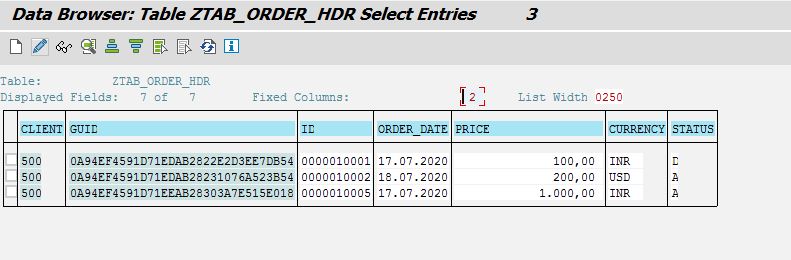
On the DB also it is changed.
To start with a simple cds view with BOPF operations, this is ok but there are still we can do a lot of things – like data is not getting refresh in the object page after action. We can also show the status text instead of single character value.
Also during the creation the status may be filled with the initial status value. So will try to do these things in the upcoming post.
See the post Fiori Elemnet- CDS View with BOPF CRUD(2) to set the order status with BOPF determination.

like data is not getting refresh in the object page after action. Do u find any solution for this?
LikeLiked by 1 person
io_modify code is not working, what is interface zif_z_order_hdr_trans_c you were referring to?
LikeLiked by 1 person
Interface – zif_z_order_hdr_trans_c is auto generated contains the “NAME” of the fields. These values are passed to : it_changed_fields. Basically we have to tell which failed is changed and to be updated.
LikeLiked by 1 person
is it possible to call a new fragment on click on action button?
LikeLiked by 1 person
Dear ,
What we need to do for the below issue
– “data is not getting refresh in the object page after action.”
In my case, after the save action the entries are saved in DB tables but the object page does not show the saved entries.. the Page becomes empty and I need to re-launch the app to see the saved entries.
LikeLike
Mine is a draft enabled list report app based on cds bopf having semantic keys
LikeLike
–
RAISE_SHORTDUMPRuntime Error: ‘RAISE_SHORTDUMP’. The OData request processing has been abnormally terminated. If you use SAP S/4HANA Cloud, please create an incident. Otherwise, if “Runtime Error” is not initial, launch ADT feed “Runtime Errors” or transaction ST22 / SM21 (system log analysis) for details and analysis.
20231219193110
LikeLike
i am facing same problem, did you solve it?
LikeLike