 All about how to test interface message in AIF
The last post Processing First Message in AIF describes how to develop AIF namespace and interface details to process message in AIF in a real heterogeneous environment.
In AIF, it is possible to assign many actions to an interface and each action can contain a sequence of processing function modules.
In a real distributed environment, mostly in development phase it is little hectic to get a message from the source system in the target AIF system to analyse why the processing function modules don’t work properly.
If developer wants to debug the AIF action function modules, then AIF provides interface test tool by which a developer can process the message in test mode(simulation mode), where no DB updated happes.
The below post shows how to test the AIF interface message using AIF test tool.
First locate the action function module name to debug in test mode for the AIF interface.
Execute Tx- /AIF/CUST

Select Structure Mappings and provide AIF namespace and interface details.

Choose Assign Actions and double click on the action name which will open a new session.

The Action screen is displayed. Choose Define Functions option.

Double click on the FM which you want to debug . It would open the FM in Tx- SE37.

Just put a break point.

Now we need a AIF message to test. We already have some few message created ( Processing First Message in AIF ) that we can see in Tx- /AIF/ERR

Provide the interface details and execute.

We have few success and error message. Select one message. Now from the toolbar, select Technical Mode.

In technical mode, an additional button- Generate Test File button is available. Select a message and click Generate Test File.

Confirm YES from popup.

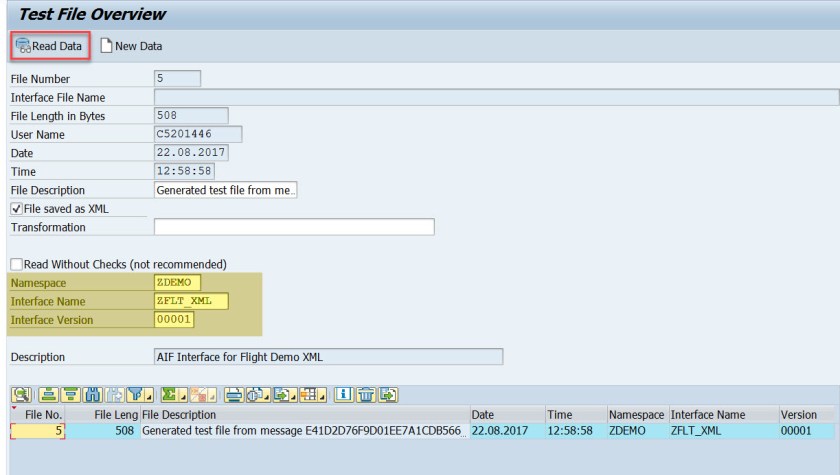
A message appears in the status bar- FIle 000005 was saved. Now the test file number.

Up to now we have set the break point in the action FM to test and generated the test file.
Now choose Tx- /AIF/IFTEST to test the interface.

Provide the test file number and execute search.

The below screen appears. Double click on the File no 5.

All Information filled from the message and Select Read Data button.
Here Testrun check box is there to execute message in test mode.
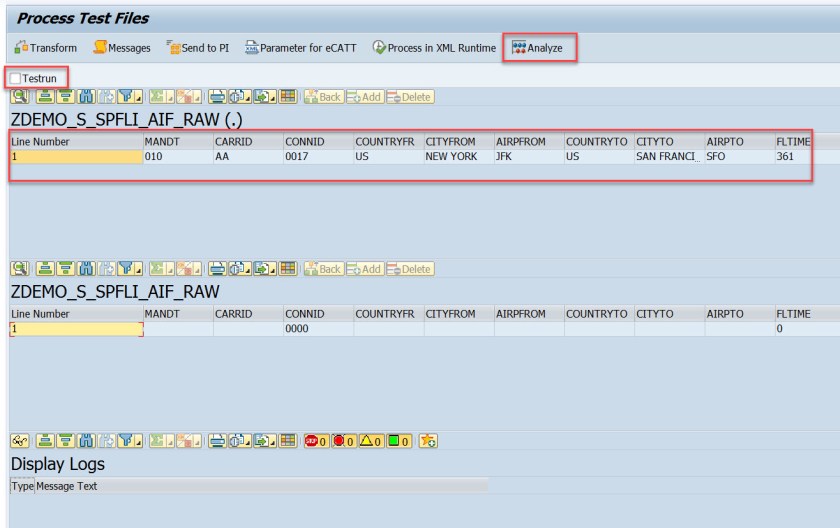
Select the Checkbox “Testrun” and select Analyze button.

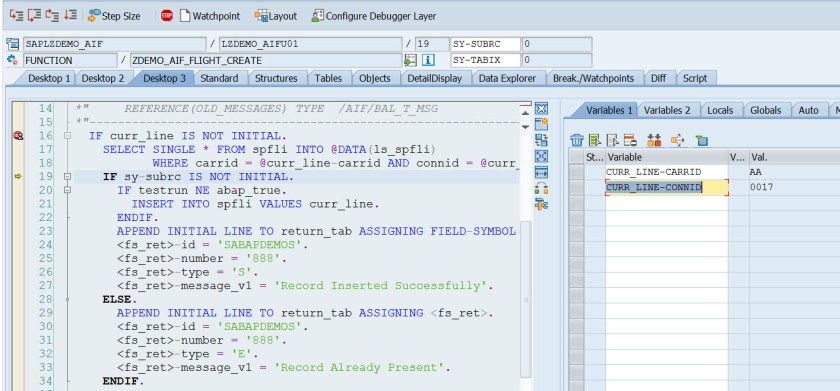
The debugger is run with all information. Press F8.
Now you can see the message log by selecting the Display Log button.

Below screen shows the message log.


in reprocessing idoc from aif..its not triggering to action fm, what could be the reason?
LikeLike